
Seed Starting
There’s something almost magical in the process of seed starting. Planting a tiny, humble seed, and watching it transform into a plant with broad, green leaves, magnificent flowers, and delicious fruits.
There’s something almost magical in the process of seed starting. Planting a tiny, humble seed, and watching it transform into a plant with broad, green leaves, magnificent flowers, and delicious fruits.

A little planning makes seed starting more efficient and will help set you up for success.
 Before you get your hands and seeds in the soil, take a minute and consider the following:
1. When is your last frost date?
Your region’s first and last frost dates are the key to successful garden planning.
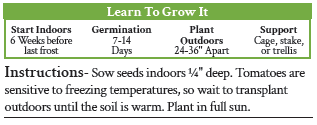
Use your last frost date to determine when to start seeds and plant out transplants. For example, here at Heritage Farm in northeast Iowa, our last spring frost is typically around May 3. Since it’s best to start tomato seeds indoors 4-6 weeks before transplanting out, we know to start the seeds 4-6 weeks before our last frost date.
Use your first frost date to determine the length of your growing season and which crops will have the time necessary to fully mature in your region.
Find your region’s frost dates here.
2. How much space do you have?
If you plan on starting seeds indoors, consider how much space you have to house your started seeds. Does this space have access to water, warmth, and supplemental lighting? Is this space out of reach of pets and pests?
Keep your outdoor space in mind, too. How much space and time can you commit to a garden? Take a few minutes to sketch out your garden and determine where you’ll plant each crop of transplants.
Once you know how many transplants you’ll need, you can determine how many seeds to purchase and plant.
3. What seeds will you start indoors, and what will you direct sow outdoors?
Many crops can be started indoors or outdoors directly into the garden, but some have a preference for one or the other.
Some crop types benefit from beginning their lives indoors, usually because they have long growing seasons and need the extra time to mature.
Crops that benefit from being started indoors include:
Some crop types prefer to be seeded outdoors and are more prone to “transplant shock,” or the stress a plant goes through when being uprooted and moved from one location to another. Transplanting these crops can be especially damaging to their roots, and most gardeners have better luck sowing these seeds directly in the garden.
Crops that benefit from being sowed directly into the garden include:
Research is also key during the planning phase. Seed packets often have guidelines about when to start seeds indoors, germination information, days to maturity, and other growing tips. But know that recommended seeding and start dates are just that: guidelines. Understand your local climate nuances (for example, a history of late, surprise frosts) and adjust as needed.
With a little extra planning, you can have a home garden that provides a bountiful harvest of both produce and seeds for future planting.
Seed starting indoors has many benefits, including an earlier harvest and extending the growing season in short-season climates. Get ahead on your gardening by starting seeds indoors and producing your own transplants. With a little planning, a few supplies and tools, plus some know-how, you’ll be on your way to seed-starting success.
A successful start begins with the right setup. Choose a method that fits your space and style. Key factors to consider include:
Early plant nutrition is vital and the right potting mix/media will provide the right nutrients. Always use a high-quality, pre-moistened seed-starting mix to support healthy germination. Plants are like humans—if they don’t have the right nutrition, they are more susceptible to diseases and pest infestations.
You don’t necessarily need to splurge on a great seed-starting mix. To create a high-quality growing medium, amend your potting mix with finished compost. When amending a potting mix:
*For example, don’t use compost that’s been made from grass clippings that have been treated with broadleaf herbicides.
Container options for seed starting vary greatly and you can certainly get creative and even recycle and repurpose items, such as milk cartons, yogurt containers, or plastic takeout boxes. Whatever container you choose, be sure it supplies adequate drainage (punch or drill drainage holes if they aren’t present).
Plastic Greenhouse Trays
If you have a large garden and are starting a lot of seeds, greenhouse trays can help you save space. Plastic greenhouse trays (1020s) are reusable and widely available. 50- 72-cell trays work great for most seeds, and 128-cell trays work well for smaller seeds like snapdragons and herbs.

Nine-Cell Packs
If you’re a small-scale gardener growing a wide range of varieties in smaller quantities, nine-cell packs are a fantastic option. They offer flexibility, save space, and are just the right size for most crops.

Soil Blocks
Some gardeners choose to use soil blocks to start seeds. Soil blocks are a low-waste, space-saving method that promotes strong root development and reduces transplant shock. However, using soil blocks may require some trial and error to work well, as the soil mix needs to hold its shape throughout the entire seed starting process.

Use a soil block-specific mix made from sifted compost, coco coir or peat, greensand, and rock phosphate.
Check out this soil blocking recipe from The Gardener’s Workshop:
For 20 cups (makes approximately 500 mini ¾” blocks or 36 of the 2” blocks)
Mix dry ingredients. Mix 3 parts dry mixture to 1 part water.
Many seeds, such as peppers, melons, and tomatoes, benefit from bottom heat, which helps the seeds establish roots. Heat mats are a great way to apply bottom heat, but placing seed trays on top of the refrigerator also works well!

Be sure to remove heat mats after germination occurs to prevent seedlings from growing too rapidly and getting spindly.
Natural sunlight from a window usually isn’t adequate, so it’s best to use supplemental lighting, such as LED grow lights or fluorescent bulbs. LED grow lights are ideal since they produce minimal heat. The light should be adjustable to accommodate the height of growing plants. We’ll talk more about light requirements later.

Create a setup that works for you and your space. For example: A tiered-wire shelf setup with hanging shop lights is an efficient, compact solution that can support the growth of hundreds—even thousands—of healthy seedlings in a small space.
You’ve gathered your supplies and set up your space, and now it’s time to sow your seeds! Follow these steps to learn how.
Getting the timing right when starting seeds indoors is especially important, because if plants remain in their small containers for too long, they will become root-bound and likely not do well when moved to the garden. The good news is that calculating timing is easy.
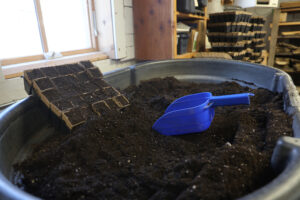
Before you fill the seed tray or container with soil, pre-moisten the soil mix. Water the soil mix or potting medium until it is damp, but not dripping, even if squeezed.
Then, fill your container, or the cells on your seed tray, with potting soil. Tamp it down with your fingers or another container to eliminate air pockets, then top it off with more potting soil.
Make small indentations in the center of each seed tray cell before dropping seeds in and covering them up. Planting the seed at the right depth is vital. Most seed packets will indicate the ideal depth, but a good rule of thumb is that the seed needs to be planted at a depth twice the diameter of the seed.
Optional: Vermiculite: A light layer of vermiculite can help retain moisture and prevent a crust from forming on the soil surface. This can also help to prevent tiny seedlings from damping off, a fungal disease that causes seedlings to wilt at the soil line.

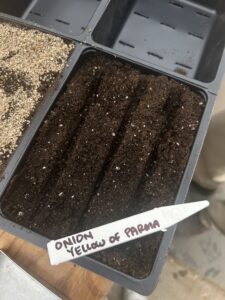
Be sure to label your seeds to avoid surprises in the garden!
Water the seeds after planting using a hose or watering can with a light stream. A strong stream of water can wash away the soil and undo your careful sowing. Keep the soil consistently moist, but not waterlogged, throughout the germination process.
While germinating, many seeds like to be warm, so take care to select a warm site for your seeds, or supplement with a heat mat. Generally, soil temperatures should be 60 degrees Fahrenheit or warmer for germination, although some crop types germinate in cooler soils.
Occasionally, seed packets will include the variety’s preferred soil temperatures. As a general guideline, the optimal temperature for germination is often 5-10 degrees warmer than the optimal temperature for growth.
If using a heat mat, remove it once the seeds sprout. Too much heat can cause the seedlings to grow rapidly, becoming weak and spindly.
A warm, humid environment promotes germination. You can place plastic dome covers over your seed tray in order to help retain moisture on the surface of the soil. Some people also tuck containers into zippered plastic bags. Once you notice the first spots of green popping up out of the soil, remove the covering to give plants good airflow and prevent fungal diseases.

There are a few key steps to take to ensure your seedlings are strong and healthy when it’s time to move them out to the garden. Most of these steps involve tending to a plant’s basic needs, but some extra care should be taken when tending to young plants.
Only a few plants need light in order to germinate, but once the seeds push forth leaves and stems, all plants will need light to continue their growth. Seedlings need 12-16 hours of consistent light each day to develop strong, healthy stems.
Natural sunlight from a window is usually inadequate. We recommend using supplemental lighting, such as LED grow lights or fluorescent bulbs. LED grow lights are ideal since they produce minimal heat.

The light should be adjustable to accommodate the height of growing plants. Keep the grow lights a few inches above the seedlings. If the light source is too far from the seedlings, they will stretch to reach the light, becoming thin and weak.
Make sure the seedlings don’t get too much heat from the grow lights. Too much heat will cause the seedlings to grow too quickly and can lead to weak, spindly stems. LED grow lights are ideal for indoor growing since they produce minimal heat.
If using grow lights isn’t an option, place seedling containers in front of a well-lit, south-facing window, and rotate the containers to encourage even plant growth.
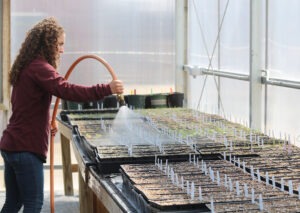 After seedlings emerge, let the top layer of soil dry between waterings. Water lightly overhead with a hose or watering can.
Overwatering can be more detrimental than underwatering in a moist environment. Check the plants daily to assess their need for water. To do this, stick a wooden pencil halfway into the cell, then remove it and check the pencil for visible moisture. If there is no visible moisture, it is time to water.
It can also be helpful to understand the weight of the container and soil. Pick it up when dry and when wet and begin to learn the difference, allowing you to use this method of testing when water is needed. Overly wet soil can begin to grow mold while overly dry soil begins to look powdery.
Bottom watering
Once the seedlings have more established root systems, you can try watering plants from the bottom-up. To do this, fill your sink or a plastic tub with about an inch of water, then place your seed tray in the water so that just the bottom of the tray is submerged. The water will slowly be absorbed into the soil and will travel up into the seedlings’ roots.
This method allows the seedlings to “drink” at their own pace and can be helpful to avoid overwatering. When you notice that the soil surface has darkened, remove your tray from the water.
Good airflow is instrumental in preventing disease. After your seeds sprout, consider setting up a small fan near your seedlings. Running the fan on low will accomplish two things: providing airflow and making your plants stronger and better prepared for life out in the garden.
Fertilize only as needed, typically four to six weeks after sowing, or after seedlings have developed at least two sets of leaves.
Liquid fertilizer, like fish emulsion, is best, as it is easy to apply and produces quick results. Make sure that you read the instructions on the bottle and dilute the mix; too much fertilizer can burn your plants.
If you are using a nutritive soil mix or compost, you don’t have to fertilize as soon or as often as you would if you are using a peat potting mix. (Peat-based potting mixes don’t have as many nutrients.)
Stop fertilizing at least several weeks before transplanting.
The growth phase just after germination is when problems tend to arise. Keep a close eye on your plants, especially for these common issues:
Pests – As you’re watering, check growth points and the undersides of leaves. Be especially mindful of pests if you have houseplants.
Damping off – Caused by botrytis, a fungus that occurs if humidity exceeds 85%. The condition comes on suddenly and is initially seen as seedling collapse. The stem withers and the seedlings topple over. The problem isn’t reversible, but can be prevented by maintaining good air circulation, not over-watering, and ensuring your soil medium is sterile. If damping off occurs, remove the affected seedling as soon as possible and maybe even some of the surrounding soil to ensure the fungus does not spread to nearby seedlings.
Leggy plants/spindly growth – Look at the lighting situation. If it’s been particularly cloudy or you live in a northern region, you may need to use supplemental lighting. High temperatures cause rapid growth and can also lead to leggy plants. Larger, older plants can also compete for light when they are close together. Space plants farther apart so that they don’t compete for resources.
Poor root growth – Poor drainage is one cause of poor root growth and can be prevented by using containers with adequate drainage. Too low temperatures and low fertility can also lead to poor root growth, as can compacted soil. When you are potting, make sure you don’t pack the soil too tightly.
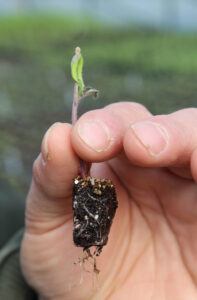
Thinning seedlings is a necessary step to ensure healthy growth of plant starts and involves removing some of the seedlings sown too close to one another so that the strongest ones can thrive. If left in crowded environs, your seedlings will eventually suffer.
Thinning ensures the proper spacing of plants, either in cells inside or in the ground outside. If your seedlings are indoors, thin them out until there is only one left in each cell or pot. If your seedlings are direct sown outdoors, thin them according to the spacing requirements on the seed packet.
Read more about how to thin seedlings.

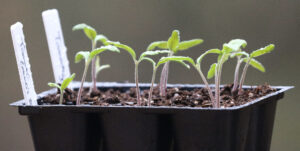
Potting up is the process of moving a plant up from one size of a container to a larger size as it needs more space to grow. It is a common practice for crops that have an extended germination period or spend a long time growing in the greenhouse, such as tomatoes, eggplants, and peppers.
Read this blog post to learn more about potting up.
When transplanting any crop, it’s best to be very gentle with the plant’s roots to prevent what’s known as “transplant shock”—ie. the stress a plant goes through when being uprooted and moved from one location to another.
Hardening Off
About seven days before transplanting them into the garden, begin hardening off your seedlings by gradually introducing them to outdoor conditions. Start by placing them in a sheltered, shady spot protected from wind and harsh sun. This transition helps reduce transplant shock.
Transplanting Outdoors
Transplant seedlings outdoors on a cloudy day, once the soil has sufficiently warmed. Refer to your seed packet to know when to transplant each crop.
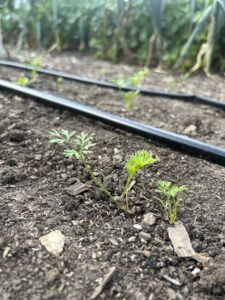
Sowing seeds directly into your garden beds is the easiest and quickest way to garden. While there are some different challenges seeds and young seedlings will face being started outdoors, if you sow a few more seeds than you think you need, you’ll have a flourishing garden in no time.
Now that you know what crops you’re going to direct seed, it’s time to figure out when to sow. Each crop type has a certain time of year that it prefers to be planted, based mainly on temperature (both the soil temperature and air temperature). Refer to your seed packets to know when to plant your selected varieties, or explore our Crop-by-Crop Growing Guides.
Some crop types require specific soil temperatures. To see if your soil is warm enough for planting, use a soil thermometer (sold at hardware or garden stores). Check the soil temperature early in the morning to establish the soil’s lowest daily temperature. Put the tip of the thermometer at least two inches into the soil. If the reading isn’t high enough, hold off planting and check again in a few days. Seeds planted in soil that is too cold are more susceptible to rotting.
When soil and air temperatures are right, it’s time to start planting! Collect your tools, seeds, and garden plan, and head out to the garden.
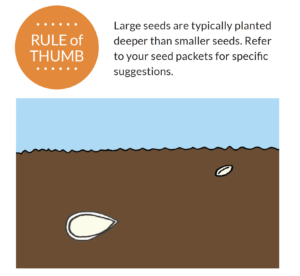
Planting Depth – Planting the seed at the right depth is vital. Most seed packets will indicate the ideal depth, but a good rule of thumb is that the seed needs to be planted at a depth twice the diameter of the seed.
Prepared Rows – If you’re planting in prepared rows, read the recommended direct-seed spacing on your seed packet and follow the instructions suggested there. These instructions often have you sow a few more seeds than you need in case some don’t germinate, so don’t worry if it feels like seeds are being spaced too closely together. Placing a tape measure across the length of the bed can help you achieve straight lines and get the proper spacing.
Depending on the width of your planting area and the crop type, you may be able to fit more than one row in the prepared space. If you’re uncertain, stick to one row so that plants have plenty of room to reach their mature size.
Planting in Blocks – If you’re planting in blocks, follow the same instructions listed above for row plantings, but be mindful of the row spacing recommendations so that mature plants don’t overcrowd one another.
Hill/Mound Planting – Some vining crops such as squash and melons can be planted in hills or mounds. Generally, you’ll create mounds that are six to eight feet apart from each other in all directions, in order to give the vines plenty of space to spread. Sow six to eight seeds per mound in a circle with a 12- inch diameter, and later thin each mound to leave the healthiest three to four seedlings.
Cut-and-Come-Again Sowings – Some gardeners will plant greens like lettuce, spinach, and arugula closer than recommended, and harvest the plants as baby greens.
For this type of planting, you will broadcast (or evenly distribute) the seeds across your planting area, and then very lightly cover your seeds with soil or compost. With this method, you don’t have to be precise about plant spacing. The entire area that you broadcast with seed should grow, creating a space filled with greens.
When plants have reached a good height (six to eight inches), harvest the greens by cutting them about two to three inches above the soil. The harvested greens are great for salad mixes, and you can return to your garden plot in a week or two and harvest again.

After you have sown your seeds, you might be tempted to sit back and relax, but before you do, make sure your seeds have the environment they need in order to grow.
Water – Seeds need water in order to grow, so be sure to water the soil regularly to provide the right moisture level, especially as seeds are germinating.
Manage weeds – Weeds should be removed throughout the gardening season, but weed removal is especially important when plants are young and small. Young seedlings struggle for resources when competing with weeds, so carefully remove the weeds as they appear to ensure your seedlings have the resources needed to keep growing. Pulling weeds while they’re young will also help prevent them from setting seed; if you wait until weeds grow tall and produce seeds, they will just create more weeds.
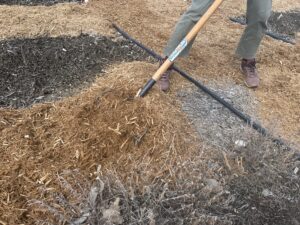
Mulch – Consider putting a thick layer (about three inches) of mulch, like straw, in the aisles and areas of the garden that have not been planted. Not only will this suppress weed growth, it will also help prevent valuable soil from washing away with the rain. Once seedlings have grown a few inches above the soil, it’s a good idea to add mulch around their stems for the same reason, being sure to keep the mulch about an inch away from the base of the plants.
Fertilize – After seedlings have established themselves, consider boosting their growth with a liquid fertilizer like fish emulsion. Be sure to dilute the solution as recommended on the bottle’s label, and pour the fertilizer on the soil at the base of the plants. (Never pour on top of the plant; fertilizer can burn a plant’s leaves.)
Thin – Once seedlings have established themselves, it’s time to thin. Thinning simply means removing the extra plants so that the remaining plants are at proper spacing (usually listed on the seed packet) and have room to mature. It’s important to thin when plants are relatively small, before their roots are intertwined with one another, and before they have begun competing with one another for resources.
Growing from Seed
Growing a garden from seed takes a little planning and care, but seeds want to grow. With a little know-how, a few tools, and some prep work, you can help them do it.
Growing from Seed, a free 20-page guide covers everything from selecting seeds to caring for new plants in your garden.
Keep Learning
Continue your learning with garden planning, plant care, and soil health.

